Part – 1 : PowerShell and DHCP : Installing DHCP Server Role on Server 2012
Part – 2 :PowerShell and DHCP : DHCP Post-Install Configuration
In my previous post, we do the Post-Install configuration task for the DHCP Server. Now it’s time to configure the DHCP Sever Scope. We can going to do the below configuration.
Configuration.
| DHCP Configuration | |||
| Name | ID |
|
|
| IP Address Scope |
| 192.168.1.100 | 192.168.1.200 |
| DNS Server | 6 |
|
|
| Gateway | 3 | 192.168.1.99 |
|
| Domain Name | 15 | Amandhally.net |
|
| Subnet Mask |
| 255.255.255.0 |
|
We configure our DHCP server to give us the automatic IP Address from Range 192.168.1.100 to 192.168.1.200. Subnet mask is “255.255.255.0” our Gateway’s IP Address is 192.168.1.99 and the IP Address of our DNS Server is “192.168.1.99”, and as a domain name for DHCP IP, I am using amandhally.net.
Scope
Before setting scopes, I want to bind the specific LAN card for DHCP Server ( as I have 2 LAN cards on my server), I don’t want to run DHCP server service on all of My LAN Cards, to do that, I can use “Set-DhcpServerv4Binding” cmdlet.
You can see I have 2 Ethernet cards on my machine, and I want to run the DHCP server on the LAN card named as “for_dhcp”.
Note: I renamed this LAN card manually, from “Local Area Network” to “for_dhcp”.
Now run the below command.
Set-DhcpServerv4Binding -InterfaceAlias "for_dhcp" -BindingState $true
Once it done, let cross check it by running the Get-DhcpServerv4Binding cmdlet.
Perfect, the Ethernet is bind.
Setting Scope.
Now, we have to set a scope for the DHCP Server, so that he can start giving us the IP addresses.
$nameScope = 'DHCP Delhi'
$startIP = '192.168.1.100'
$endIP = '192.168.1.200'
$subnetMask = '255.255.255.0'
For my ease, I set my settings is variable, so that is easy to change later on {idea for scripting } , and save them as a script file for later use.
Above, I am setting the name of the scope to “DHCP Delhi” and the DHCP server start leasing the IP Address from “192.168.1.100” to end IP address of “192.168.1.200”. and my subnet mask will be “255.255.255.0”.
We have to set all of above using the “Add-DhcpServerv4Scope” cmdlet.
Now, Once you set the variable, run the below command. By using –State parameter to True, we are making this scope active.
Add-DhcpServerv4Scope -Name $nameScope -StartRange $startIP -EndRange $endIP -SubnetMask $subnetMask -State Active
Or
Add-DhcpServerv4Scope -Name 'DHCP Delhi'-StartRange '192.168.1.100' -EndRange $'192.168.1.200' -SubnetMask '255.255.255.0'-State Active
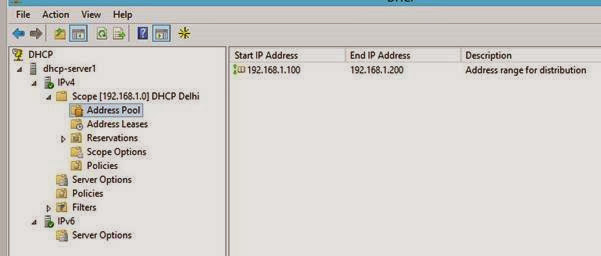
Once the above command run successfully, open your DHCP Server Manager and you can see that we have a new scope and that scope it Active.
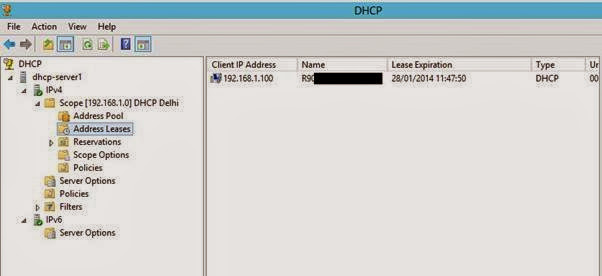
Even our DHCP Sever is started giving the address to other laptop on the network too.
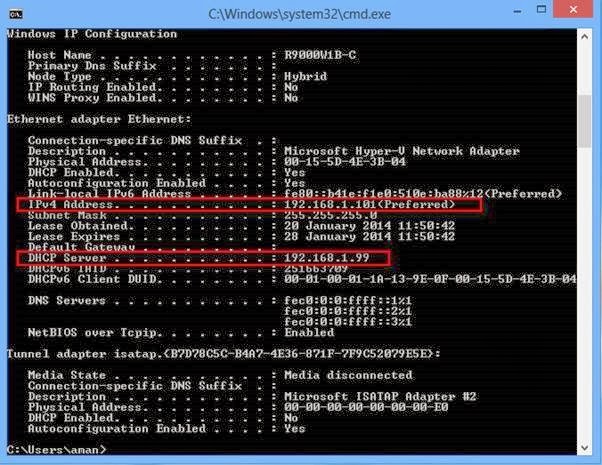
And I run Ipconfig /release and then Ipconfig /renew on another laptop and he gets the IP address from our server too.
Now, when you open the console, you can see our DHCP Server has given 2 ips to the computers.
Great J Isnt’
Till, now , we are successfully able to get the IP address on client system from our DHCP Server, But we won’t able to connect to Internet or other services, until we configure the Router and DNS options in the DHCP Server,
In our next blog post we are going to do that.
See you in my next blog post.


No comments:
Post a Comment
Note: Only a member of this blog may post a comment.